Generators act as an alternative power source for emergency backup. However, merely possessing the generator isn’t enough. You need to be aware of its functioning as well. The first step is to check the voltage output of your generator. The voltage coming out of the generator’s outlet is sometimes too much or at times a little too low. Hence, one of the first things one must do is check the voltage at the outlets and ensure that the generator has the required voltage. The right way to check the voltage output of your generator will ensure safety along with efficiency.
Let’s see what’s the best and easy way to check the voltage output of a generator:
sendrat
reinforce-msk
scott 26 zoll xs
nachttisch hemnes
sendrat
wasserdichte trekkingschuhe herren Switzerland
secretsummits
hottubtravels
flo bayan polaris ayakkabı
acematrix.net
philips avent babyphone scd711
secretsummits
disfraz hada del verano
hijauanhills
7 Steps to Check the Voltage Output on a Generator
κρεβατια μονα με αποθηκευτικο χωρο και στρωμα
chia seeds benefits for women
westerm kalap
blow up two person kayak
pouf porta scarpe
långa jeanskjolar
nike survetement
marc jacobs handtassen outlet
ισοθερμικο μπλουζακι stok
adidas superstar ii femme
věšák na klíče domeček
accessoire cheveux annees 30 chez amazon
stetson straw cowboy hats
casio model calculator
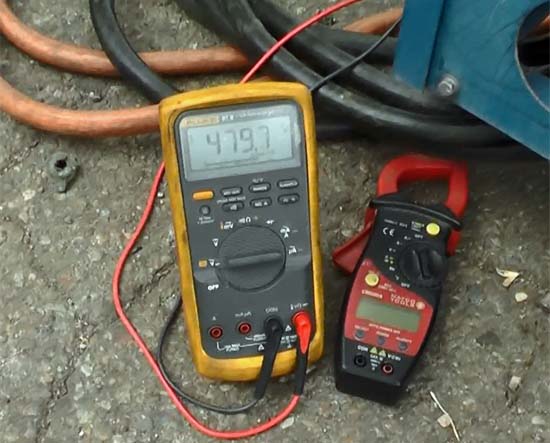
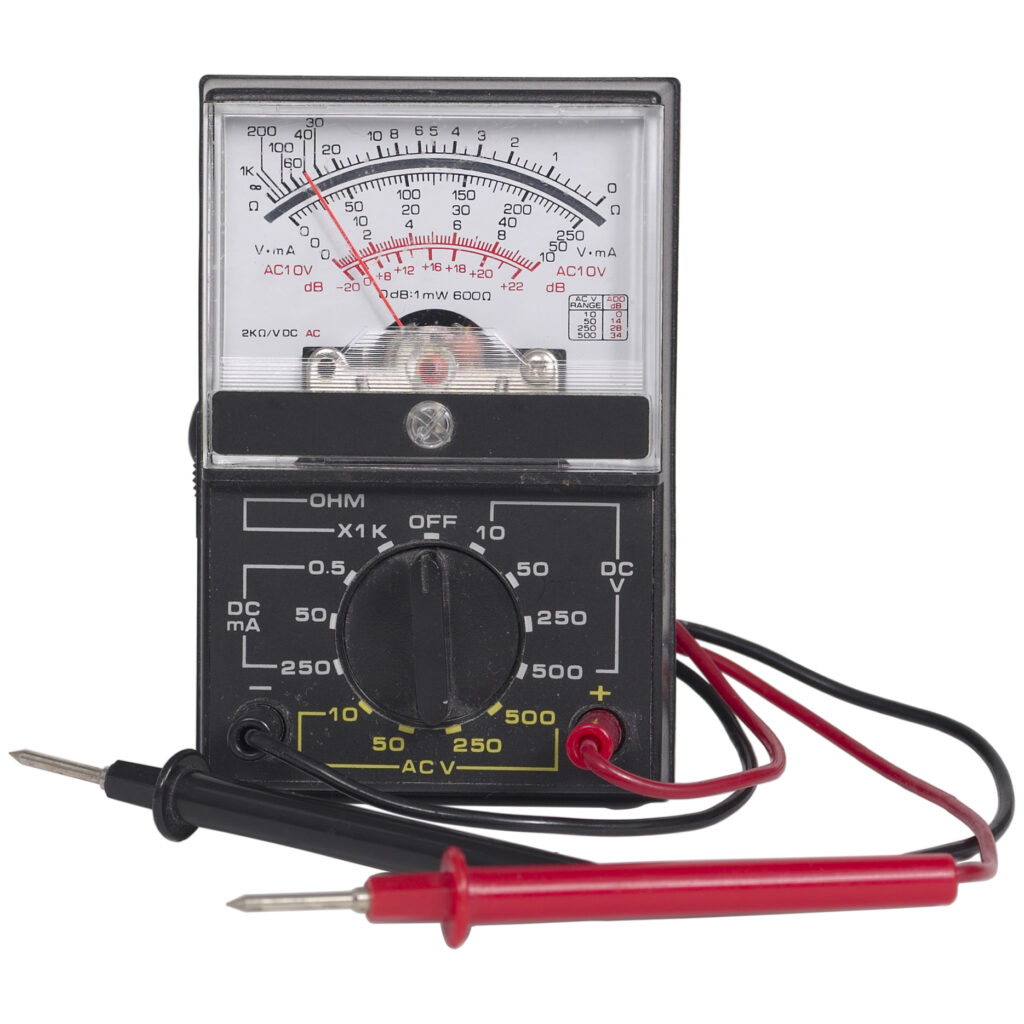
Step #1. Get Yourself a ‘Voltmeter’
A voltmeter is an instrument that is used for measuring electric potential. You should get a decent one within the range of $10 to $20.
Step #2. Start Your Generator
Put the generator’s choke at the START position. Flip the generator’s power switch or turn the key in the ignition to the ‘ON’ position. If your generator has a recoil cord, you need to pull the cord to start the engine. At this point, in case your generator does not start, you need to double-check if the fuel line is open.
Step #3. Turn On the Voltmeter to the ‘AC Voltage’ Position
Turn on the voltmeter while the generator is running. You must turn the voltmeter to the ‘AC’ position. Otherwise, you risk blowing a fuse. To turn on the AC position, move the dial on the voltmeter to the point marked for testing AC voltage. The AC voltage position might be marked by various symbols such as “ACV,” “A~,” “ACA,” or “V~.” However, if you are confused about the AC voltage testing position, you can go through the manufacturer’s instructions for the voltmeter.
Step #4. The Black Lead of the Voltmeter Is to Be Attached to the Frame of the Generator
Next, you need to attach the meter to the frame of the generator. To do so, you need to plug the black cable that comes with the voltmeter into the black socket on the voltmeter. Then, you have to clip the other end of the cable anywhere on the generator’s frame. There should be an alligator clip found on the lead. This should help in attaching the meter to the engine frame. This will ground your meter. It is very important to ground your meter to protect electrical wires and components from damage due to sudden power surges. If your voltmeter cable doesn’t feature a built-in alligator clip, you will need to get an alligator clip externally to clip the metal tip of the cable to the generator frame. So, the guys from schlüsseldienst berlin strongly recommend checking all your wires.
 Step #5. The Red Lead From the Voltmeter to Be Plugged Into the Generator’s Output Plug Outlet
 Step #5. The Red Lead From the Voltmeter to Be Plugged Into the Generator’s Output Plug Outlet
Next, you need to attach the red lead of the meter to the output plug of the generator. The output plug outlet is the place to plug any power cable into the generator. Plug the red cable of the voltmeter into the red socket on the voltmeter. Then, to read the voltage, the metal tip at the other end of the cable should be put inside the output plug of the generator.
Step #6. Note Down the Reading on the Voltmeter to See the Output in Volts
Check the display of the voltmeter. Read the displayed voltage. Note the number. The displayed reading is the current-voltage output of the generator. The number displayed is the number of volts of power that your generator is putting out. For instance, if your generator has a 220-volt output outlet, the display in the voltmeter should show 220 volts or very close to that number.
Depending on the generator type you’re using, there can be different output plug outlets for different voltages. For instance, it can have a 120-volt outlet and a 220-volt outlet. The different volt outlets will be labeled and might look different. You should test all the outlets in an above-mentioned way. The 120-volt output outlets are most commonly used for plugging in standard electrical devices, while the 220-volt outlets are mostly used for things that require more power.
Step #7. Disconnect the Voltmeter and Turn Off the Generator
As the last step, you need to unclip the black cable and safely remove the red cable. Flip the power switch to the ‘OFF’ position or switch ‘OFF’ the ignition switch to shut down the generator.
Warnings and Safety Measures
As you can see, it is more or less a straightforward process to test a generator’s voltage output. However, it is pertinent that you exercise utmost caution to do away with all dangers and fatal accidents:
- It is advised that one should step on a rubber mat and wear non-conductive- sole shoes while carrying out the process. This will act as a shield to protect you against possible electric accidents that can harm you.
- At all times during the process, you should avoid touching the wires as doing so could lead to electric shock. You should also avoid touching the voltage regulator for similar reasons.
- Never use an extension cord to connect your home’s electric system with the generator. This can cause serious damage to electric appliances as well as can be an electrical hazard to all persons.
Final Remarks
You must make sure that in all circumstances, the total load from the devices should never exceed the generator’s output. Another factor to be kept in mind is that generators usually come listed with a continuous/constant load specification. This is the quantity of power that the specific generator can safely put out for an extended period. Moreover, some devices require large amounts of starting wattage compared to their running wattage. The best example of such a situation is that of a washing machine. A washing machine might require 750W while running, but while starting, it might require about 2,300W. Hence you might want to distinguish between what will constantly be running versus the maximum amount of power that you’ll need.